
C++ Refresher - Namespaces
In C++ Namespaces are mostly used to avoid name conflicts. For example, you might be writing some code that has a function called draw() and there is another library available with the same function draw(). Now the compiler has no way of knowing which version of draw() function you are referring to within your code. A namespace is designed to overcome this difficulty and is used as additional information to differentiate similar functions, classes, variables etc. with the same name available in different libraries. Example:
namespace graphics { void draw() { // function graphics::draw() } }
namespace ui { void draw() { //function ui::draw() } }
This explains why you type using namespace std; in programs that reference entities in the standard library. If you don’t write using namespace std; you will have to explicitly add std:: before anything in the std namespace.
Example:
std::cout « “Hello World!” « std::endl;
std::string s;
std::vector<std::string vs;
Some people prefer to write > std:: Also if you only need a few distinct functions, you can tell it just that. For example, if you only plan on using cout and endl, there is no need to use the entire std namespace. Instead:
using std::cout;
using std::endl;
A good example of the correct use of namespaces in C++ is the C++ Standard Library. Everything in this quite large library is placed in a single namespace called std - there is no attempt or need to break the library up into (for example) an I/O sub-namespace, a math sub-namespace, a container sub-namespace etc.
Read the entire post...
layout: post type: post tags:
- Raspberry-Pi-3
- SOC
- MicroSD
- Internet of Things published: true title: man in the middle device —
Raspbery-pi mitm device
Haven’t posted in a while due to a busy schedule. CUrrently working on an interesting idea that I will hopefully share before the end of this year. After looking through different pi projects and what people have built, I have decided to attempt to create a man-in-the-middle device that could be discreetly attached to a remote network and could redirect and sniff traffic. For those who don’t know, a man-in-the-middle attack involves secretly becoming an intermediary between the communication between two parties; each thinks they are talking to the other when in fact they are both talking to the attacker. The attacker can choose to pass the information along unmodified(simply observing the communication) or may choose to modify parts of the communication for their own nefarious ends.
One of the counter measures of mitm is the use of SSL/TLS to the verify the other party in a communication.TLS however relies on a public key infrastructure, and there have already been examples of hackers breaking into certificate authorities and issuing fraudulent certificates so as to perform man-in-the-middle attacks on HTTPS sessions I’ll provide updates on this interesting project.This project will first perform mitm attacks on HTTP traffic, then we can add more features to it and make it more advanced…
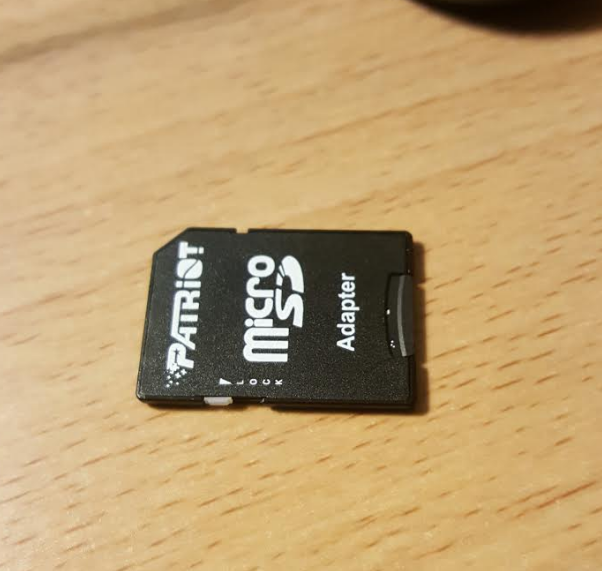
Need MicroSD to boot raspberry-pi
So the raspberry-Pi doesn't come with an OS and you will need to install one yourself. I always wondered how the OS installation was done.Sometimes you can bypass this small detail when reading about it online.  As Aristotle once said, "For the things we have to learn before we can do them, we learn by doing them". By doing something you will in deed learn much more than by just reading about it.  Basically the Operating System installation is performed by downloading an OS of your choice, flash it to a microSD and boot your raspberry Pi.
So in that regard, I just purchased a microSD to be used for this purpose. However, I havent yet decided which OS to use since I'm still contemplating on what to build with the pi. I have a few ideas.   I'll provide updates on this interesting project.
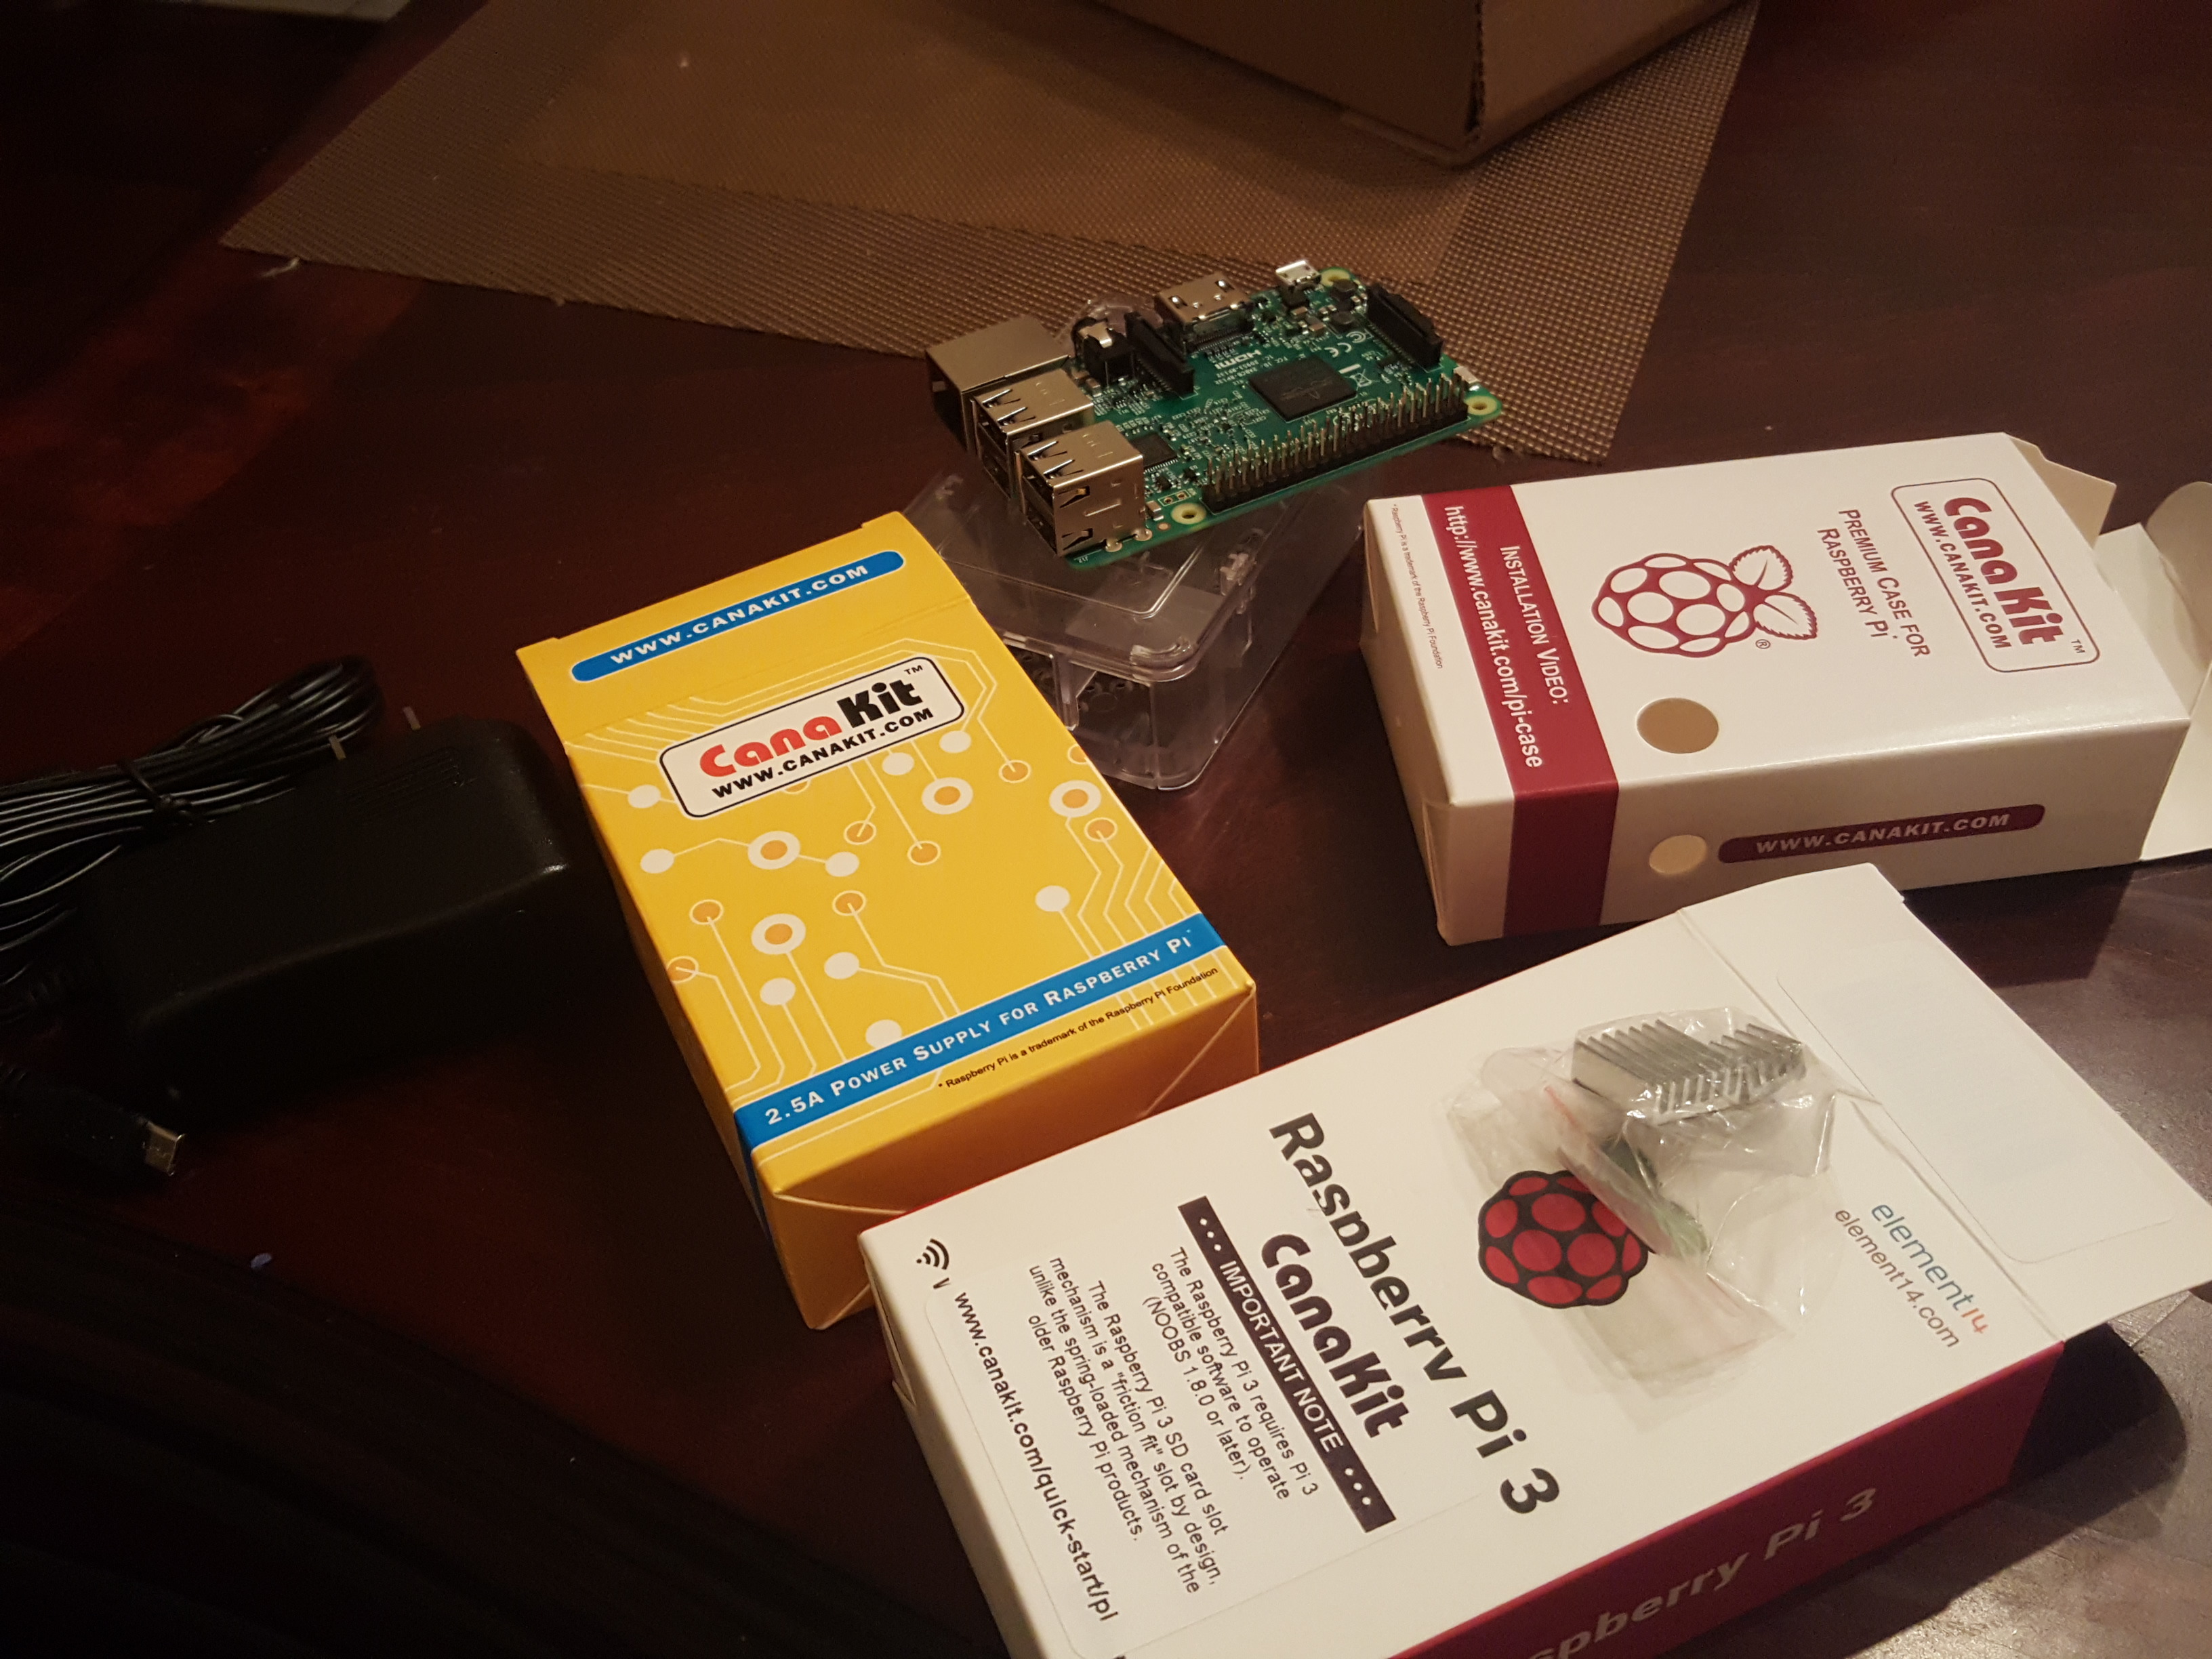
Just Got my Raspberry-Pi
Been very very busy the past few months.
Just got the new Raspberry Pi 3 model B delivered. Curious to see what this SOC can do. WIll update the blog with my progress or the end product that I end up building.
Gerrit Workflow
First thing to do when contributing to Openstack is familiarize yourself with their git-review system and to set-up your environment.
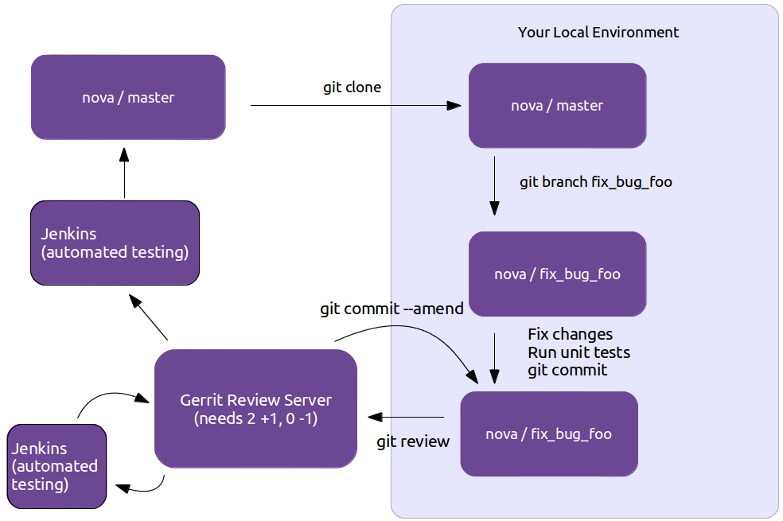
I’m running Centos 7 and these are the steps I followed: -First sign up for a Launchpad account, this is how the Web interface for the Gerrit code review system will identify you. It’s also useful for automatically crediting bug fixes to you when you address them with your code commits. -Next join The OpenStack Foundation(it’s free and required for all code contributors).Among other privileges, this also allows you to vote in elections and run for elected positions within The OpenStack Project. When signing up for Foundation Membership, make sure to give the same E-mail address you’ll use for code contributions, since this will need to match your preferred E-mail address in Gerrit.
- Visit https://review.openstack.org/ and click the Sign In link at the top-right corner of the page. Log in with your Launchpad ID.
- Because Gerrit uses Launchpad OpenID single sign-on, you won’t need a separate password for Gerrit, and once you log in to one of Launchpad, Gerrit, or Jenkins, you won’t have to enter your password for the others.
- You’ll also want to upload an SSH key while you’re at it, so that you’ll be able to commit changes for review later.
- Ensure that you have run these steps to let git know about your email address:

-To check your git configuration

Git Review Installation
-I ran pip install git-review on my Centos 7 installation

Project Setup
- Once you have chosen the OpenStack project to contribute to, you’ll clone it the usual way, for example:

- You may want to ask git-review to configure your project to know about Gerrit at this point. If you don’t, it will do so the first time you submit a change for review, but you probably want to do this ahead of time so the Gerrit Change-Id commit hook gets installed. To do so

-
Git-review checks that you can log in to gerrit with your ssh key. It assumes that your gerrit/launchpad user name is the same as the current running user. If that doesn’t work, it asks for your gerrit/launchpad user name. If you don’t remember the user name go to the settings page on gerrit to check it out (it’s not your email address).
-
Note that you can verify the SSH host keys for review.openstack.org here: https://review.openstack.org/#/settings/ssh-keys
-
If you get the error “We don’t know where your gerrit is.”, you will need to add a new git remote. The url should be in the error message. Copy that and create the new remote.

-
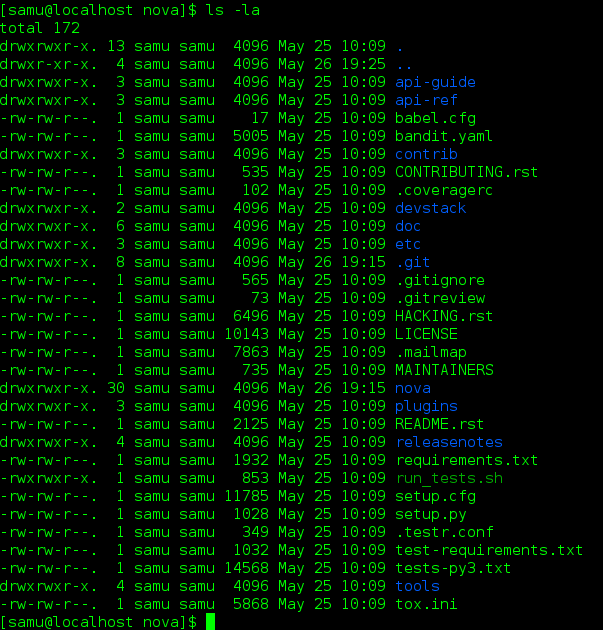
In the project directory, you have a .git hidden directory and a .gitreview hidden file. You can see them with:
Normal Workflow
- Once your local repository is set up as above, you must use the following workflow.
-
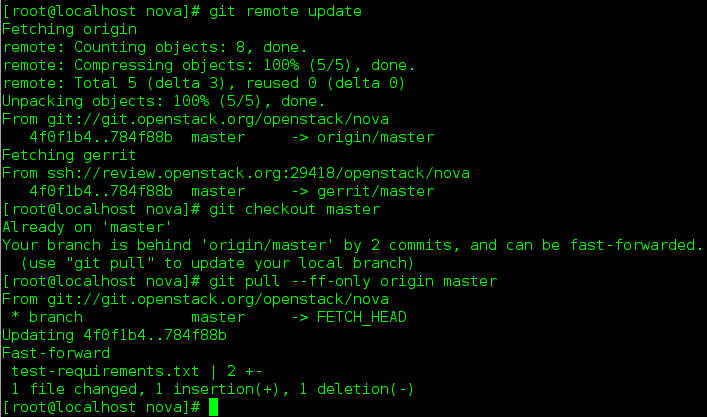
Make sure you have the latest upstream changes by running the following commands
  git remote update
  git checkout master
  git pull --ff-only origin master
- Create a topic branch to hold your work and switch to it. If you are working on a blueprint, name your topic branch bp/BLUEPRINT where BLUEPRINT is the name of a blueprint in launchpad (for example, “bp/authentication”). The general convention when working on bugs is to name the branch bug/BUG-NUMBER (for example, “bug/1234567”). Otherwise, give it a meaningful name because it will show up as the topic for your change in Gerrit.

- To generate documentation artifacts, navigate to the directory where the pom.xml file is located for the project and run the following command:

Committing Changes
- Git commit messages should start with a short 50 character or less summary in a single paragraph. The following paragraph(s) should explain the change in more detail.
-
If your changes addresses a blueprint or a bug, be sure to mention them in the commit message using the following syntax:
Implements: blueprint BLUEPRINT Closes-Bug: ####### (Partial-Bug or Related-Bug are options) -
For example:
Adds keystone support ...Long multiline description of the change... Implements: blueprint authentication Closes-Bug: #123456 Change-Id: I4946a16d27f712ae2adf8441ce78e6c0bb0bb657 -
Note that in most cases the Change-Id line should be automatically added by a Gerrit commit hook that you will want to install. See Project Setup for details on configuring your project for Gerrit. If you already made the commit and the Change-Id was not added, do the Gerrit setup step and run:
git commit --amend -
The commit hook will automatically add the Change-Id when you finish amending the commit message, even if you don’t actually make any changes.
-
Make your changes, commit them, and submit them for review:
git commit --a git review -
Caution: Do not check in changes on your master branch. Doing so will cause merge commits when you pull new upstream changes, and merge commits will not be accepted by Gerrit.
- Prior to checking in make sure that you run “tox”.
Seeking Python Guru status.
Today I decided to become a volunteer for the openstack-nova project. I like to consider myself a good Python programmer. However, I’ve mostly been utilising my skills within the sysadmin and Devops realm. I want to expand from this realm and become a ‘Guru’ in python if there’s anything like that. I looked for different python projects to contribute to. I ended up with twisted matrix and openstack, my personal preference made me choose openstack nova. I like the code structure in openstack and also feel that cloud computing is something that has and will continue to disrupt the IT field. I want to be a part of this.
Contributing to Openstack:
- There’s many ways to contribute, for more information visit: https://wiki.openstack.org/wiki/How_To_Contribute
I chose the Developer option, cloned the Nova repository and I’m now working on bugs, focusing on the low-hanging fruits to be precise. I will provide updates during this interesting and adventorous journey.
Thanks,
Read the entire post...
Mocha uses behaviour driven development(BDD). It uses the describe and it functions in place of J unit style suites and tests. BDD is designed to read more like stories than tests. Mocha does not come with it’s own assertion framework, this means you can use whichever you choose. Node.js has a built in assert module that is good enough, that’s what we used in the example below. To run the test, you have to use Mocha’s executable path, this is installed in $YOUR_PROJECT/node_modules/mocha/bin/mocha. You use this command: ./node_modules/.bin/mocha test.js. You can add it in your executable
## file test.js below

var assert =  require('assert');

describe('my feature', function() {
    it('works', function() {
     assert.equal('A', 'A');
    });
    it('fails gracefully', function() {
     assert.throws(function() {
      throw 'Error!';
     });
    });
 });

describe('my other feature', function() {
    it('async', function(done) {
     setTimeout(function() {
      done();
     }, 25);
    });
 });

## Below should be the output.

$./node_modules/.bin/mocha test.js

  my feature
     works
     fails gracefully

  my other feature
     async

  3 passing (38ms)
$
You can also use Gulp to automate the Mocha tests. When you run gulp, it waits for a file to change, when it changes it runs your tests and then it reports the results and goes back to waiting for more file changes. This enables you to get fast feedback on your work since you dont have to re-type your test command to run your tests. All you have to do is hit Control-S.
Include it in your package.json like below:
{
"dependencies": {
 "gulp": "3.8.11",
 "gulp-mocha": "2.0.1"
 "mocha": "2.2.4"
  }
}
Gulp is separated by tasks listed in a file gulpfile.js.
Below is a gulp file example with 2 tasks, test and watch.

var gulp = require('gulp');
var mocha = require('gulp-mocha');

gulp.task('test', function() {
    gulp.
      src('./test.js').
      pipe(mocha()).
      on('error', function(err) {
        this.emit('end');
      });
 });
  /* the watch task below watches all the .js files in the cwd and re-runs the test task when any of the files change*/
gulp.task('watch', function() {
    gulp.watch('./*.js', ['test']);
});
Network bonding is a method of combining (joining) two or more network interfaces together into a single interface. It will increase the network throughput, bandwidth and will give redundancy. If one interface is down or unplugged, the other one will keep the network traffic up and alive. Network bonding can be used in situations wherever you need redundancy, fault tolerance or load balancing networks. There are different bonding modes described below:
mode=0 (balance-rr)

Round-robin policy: It the default mode. It transmits packets in sequential order from the first available slave through the last. This mode provides load balancing and fault tolerance.

mode=1 (active-backup)

Active-backup policy: In this mode, only one slave in the bond is active. The other one will become active, only when the active slave fails. The bond’s MAC address is externally visible on only one port (network adapter) to avoid confusing the switch. This mode provides fault tolerance.

mode=2 (balance-xor)

XOR policy: Transmit based on [(source MAC address XOR’d with destination MAC address) modulo slave count]. This selects the same slave for each destination MAC address. This mode provides load balancing and fault tolerance.

mode=3 (broadcast)

Broadcast policy: transmits everything on all slave interfaces. This mode provides fault tolerance.

mode=4 (802.3ad)

IEEE 802.3ad Dynamic link aggregation. Creates aggregation groups that share the same speed and duplex settings. Utilizes all slaves in the active aggregator according to the 802.3ad specification.

Prerequisites:

– Ethtool support in the base drivers for retrieving the speed and duplex of each slave.
– A switch that supports IEEE 802.3ad Dynamic link aggregation. Most switches will require some type of configuration to enable 802.3ad mode.

mode=5 (balance-tlb)

Adaptive transmit load balancing: channel bonding that does not require any special switch support. The outgoing traffic is distributed according to the current load (computed relative to the speed) on each slave. Incoming traffic is received by the current slave. If the receiving slave fails, another slave takes over the MAC address of the failed receiving slave.

Prerequisite:

– Ethtool support in the base drivers for retrieving the speed of each slave.

mode=6 (balance-alb)
Adaptive load balancing: includes balance-tlb plus receive load balancing (rlb) for IPV4 traffic, and does not require any special switch support. The receive load balancing is achieved by ARP negotiation. The bonding driver intercepts the ARP Replies sent by the local system on their way out and overwrites the source hardware address with the unique hardware address of one of the slaves in the bond such that different peers use different hardware addresses for the server.
I have a Dell PowerEdge 2950 with Centos 7 installed, It has 2 NICs: 1. enp0s8. 2. enp0s9.
We’ll combine enp0s8 with enp0s9 to make up bond0. In Centos 7 you have to load the bonding module(this is a special kernel module that provides the linux bonding driver) since it is not loaded by default. modprobe –first-time bonding You can then run: modinfo bonding to view the module information. Now we’ll create a bond0 config file, this will be done in /etc/sysconfig/network-scripts directory. Run the following command as root user to create the bond0 file. vi /etc/sysconfig/network-scripts/ifcfg-bond0 add the following lines to that file(the above command creates the ifcfg-bond0 file since it doesn’t exist yet)
DEVICE=bond0
NAME=bond0
TYPE=Bond
BONDING_MASTER=yes
IPADDR=192.168.0.69
PREFIX=24
ONBOOT=yes
BOOTPROTO=none
BONDING_OPTS="mode=1 miimon=100
Note: The BONDING_OPTS describes the bonding mode which in our case will be active-backup. Save and close the file. Next we will modify the enp0s8 and enp0s9 config files
Edit file /etc/sysconfig/network-scripts/ifcfg-enp0s8,

vi /etc/sysconfig/network-scripts/ifcfg-enp0s8 Modify the file as shown below.

HWADDR="08:00:27:04:03:86"
TYPE="Ethernet"
BOOTPROTO="none"
DEFROUTE="yes"
PEERDNS="yes"
PEERROUTES="yes"
IPV4_FAILURE_FATAL="no"
IPV6INIT="yes"
IPV6_AUTOCONF="yes"
IPV6_DEFROUTE="yes"
IPV6_PEERDNS="yes"
IPV6_PEERROUTES="yes"
IPV6_FAILURE_FATAL="no"
NAME="enp0s8"
UUID="a97b23f2-fa87-49de-ac9b-39661ba9c20f"
ONBOOT="yes"
MASTER=bond0
SLAVE=yes Then, Edit file /etc/sysconfig/network-scripts/ifcfg-enp0s9,

vi /etc/sysconfig/network-scripts/ifcfg-enp0s9 Modify the file as shown below.

HWADDR=08:00:27:E7:ED:8E
TYPE=Ethernet
BOOTPROTO=none
DEFROUTE=yes
PEERDNS=yes
PEERROUTES=yes
IPV4_FAILURE_FATAL=no
IPV6INIT=yes
IPV6_AUTOCONF=yes
IPV6_DEFROUTE=yes
IPV6_PEERDNS=yes
IPV6_PEERROUTES=yes
IPV6_FAILURE_FATAL=no
NAME=enp0s9
UUID=e2352c46-e1f9-41d2-98f5-af24b127b3e7
ONBOOT=yes
MASTER=bond0
SLAVE=yes
Save and close the files.
Now, activate the Network interfaces.
ifup ifcfg-enp0s8
ifup ifcfg-enp0s9 Now, enter the following command to make Network Manager aware the changes.

nmcli con reload Restart network service to take effect the changes.

systemctl restart network Test Network Bonding
Now enter the following command to check whether the bonding interface bond0 is up and running:
cat /proc/net/bonding/bond0 Sample output:

Ethernet Channel Bonding Driver: v3.7.1 (April 27, 2011)

Bonding Mode: fault-tolerance (active-backup)
Primary Slave: None
Currently Active Slave: enp0s8
MII Status: up
MII Polling Interval (ms): 100
Up Delay (ms): 0
Down Delay (ms): 0

Slave Interface: enp0s8
MII Status: up
Speed: 1000 Mbps
Duplex: full
Link Failure Count: 0
Permanent HW addr: 08:00:27:5d:ad:75
Slave queue ID: 0

Slave Interface: enp0s9
MII Status: up
Speed: 1000 Mbps
Duplex: full
Link Failure Count: 0
Permanent HW addr: 08:00:27:48:93:cd
Slave queue ID: 0 As you see in the above output, the bond0 interface is up and running and it is configured as active-backup(mode1) mode. In this mode, only one slave in the bond is active. The other one will become active, only when the active slave fails. To view the list of network interfaces and their IP address, enter the following command:

ip addr
That’s it.
Configure multiple IP addresses for bond0
I want to assign multiple IP addresses to bond0 interface. What should i do? Very simple, just create an alias for the bond0 interface and assign multiple IP addresses.
For example we want to assign IP address 192.168.0.151 to bond0. To create an alias for bond0, copy the existing configuration file(ifcfg-bond0) to a new configuration file(ifcfg-bond0:1).
cp /etc/sysconfig/network-scripts/ifcfg-bond0 /etc/sysconfig/network-scripts/ifcfg-bond0:1 Then edit the alias file /etc/sysconfig/network-scripts/ifcfg-bond0:1,

vi /etc/sysconfig/network-scripts/ifcfg-bond0:1 Modify the device name and IP address as shown below.

DEVICE=bond0:1
NAME=bond0
TYPE=Bond
BONDING_MASTER=yes
IPADDR=192.168.0.151
PREFIX=24
ONBOOT=yes
BOOTPROTO=none
BONDING_OPTS="mode=1 miimon=100"
Here,
bond0:1 – Device name
192.168.0.151 – IP address of bond0:1 Save and close the file. Restart network service to take effect the saved changes.

systemctl restart network Now list out the network interfaces and their IP address using the command:

ip addr
The alias bond0:1 has been created and it’s up now.
Read the entire post...
MongoDB lets you store in query form nested documents within arrays, check below example for nested document for ratings and an array field for screenplay authors
var doc = {
   title: 'Jaws',
   year: 1975,
   director: 'Steven Spielberg',
   rating: 'PG',
   ratings: {
      critics: 80,
      audience: 97
    },
    screenplay: ['Peter Benchley', 'Carl Gotlieb']
  };

db.collection('movies').insert(doc, function(error, result) {
if (error) {
  console.log(error);
  process.exit(1);
}

  db.collection('movies').
  find({ screenplay: 'Peter Benchley' }).
  toArray(function(error, docs) {
  /*note the (.) in the ratings.audience, this is what is used to search through a nested document in the database */
    db.collection('movies').
      find({ 'ratings.audience': {'$gte': 90 }}).
      toArray(function(error, docs) {
- A child process,
- spawned with fork,
- terminated with exit;
- status determined with wait.
- Post-execution,
- child metadata lingers,
- remaining in the process table,
- until its status is known.
- In this state of limbo,
- the child is a zombie,
- if its parent dies,
- the child is an orphan.
- init, pid==1,
- is a foster parent;On the
- adopting orphaned processes,
- their ppid becomes 1.
- init is a reaper,
- freeing process table slots;
- calling wait periodically,
- may its zombies R.I.P.
Boot up/ restart your server. As soon as the grub menu loads, hit e to edit.
Look for this line, rhgb quiet LANG-en_US.UTF-8 Add rd.break at the end of that line. Then hit ctrl + x to boot into single user mode
-
mount -o remount,rw /sysroot
-
chroot /sysroot
Now you can change the password by typing passwd root and creating new password
-
passwd root–change the password
-
exit
Finally, relable all files when system boots up, this is important so as to maintain due to SElinux contexts
- touch / .autorelabel#if this is not done passwd change will not be successful ~~~
~~~ bash 1st generate ssh signed key , either dsa or rsa(preferred/default)
ssh-keygen -t rsa ssh-keygen —-will default to rsa
copy the public key inside the .ssh directory
cd .ssh you will see a id_rsa –the private key and id_rsa.pub the public key
ssh-copy-id user@ipaddress..you are copying the public key to the remote server that you need to have keybased authentication
prevent passwd everytime on session
- ssh-agent bash
- ssh-add
permissions on private key should be 600 permissions on public key should be 644
Read the entire post...
SOLARIS 6 DISK REPLACEMENT
In this example, the disk to be replaced is c0t0d0, which is currently mirrored with c0t8d0
Run the below commands.
cd /usr/opt/SUNWmd/sbin # This is where all the commands for disk replacement are located.
Disk to be replaced c0t0d0 —>c0t8d0 to be used for labelling(since they’re mirrored) Run command:
cfgadm -av c0
For more information about the cfgadm command and it’s uses please visit: #http://docs.oracle.com/cd/E23824_01/html/821-1462/cfgadm-1m.html
Now run metastat -p to determine the mirrors and submirror Note, save the above information somewehere, this will be used in detaching and also reattaching the mirrors
bash-3.2$ metastat -p
d0 -m d10 d20 1
d10 1 1 c0t0d0s1
d20 1 1 c0t8d0s1
d3 -m d13 d23 1
d13 1 1 c0t0d0s0
d23 1 1 c0t8d0s0
d4-m d14 d24 1
d14 1 1 c0t0d0s5
d24 1 1 c0t8d0s5
d5 -m d15 d25 1
d15 1 1 c0t0d0s3
d25 1 1 c0t8d0s3
d6 -m d16 d26 1
d16 1 1 c0t0d0s1
d26 1 1 c0t8d0s1


#Now proceed to detach the mirrors

metadetach -f d0 d10
metadetach -f d3 d13
metadetach -f d4 d14
metadetach -f d5 d15
metadetach -f d6 d16


Now we need to clear the metadevices that we detached from above.


metaclear d10 d13 d14 d15 d16 && ./metastat -p

delete the state database replicas using the below command

./metadb -d c0t0d0s7

Show the new config.
./metastat -p

Now insert the New Disk and after it's initialized continue below

format
Label it now? y
format> label
ready to label disk, continue? y
format>q

##clear slice "7"

metadb -d c0t0d0s7

#Copy the partition table from c0t8d0
prtvtoc /dev/rdsk/c0t8d0s2 | fmthard -s - /dev/rdsk/c0t0d0s2
metadb -a -c 3 c0t0d0s7


#Configure the metadevices on the new disk

metainit d10
metainit d13
metainit d14
metainit d15
metainit d16


#Reattach the mirrors and the submirrors

metattach d0 d10
metattach d3 d13
metattach d4 d14
metattach d5 d15
metattach d6 d16

#Run below command to check the status of the disk re-sync status

while true; do clear; ./metastat |grep sync ; sleep 15; done